WATCH LIVE CRICKET


Monday, September 8, 2014

How to Install a Printer

   How to Install a Printer
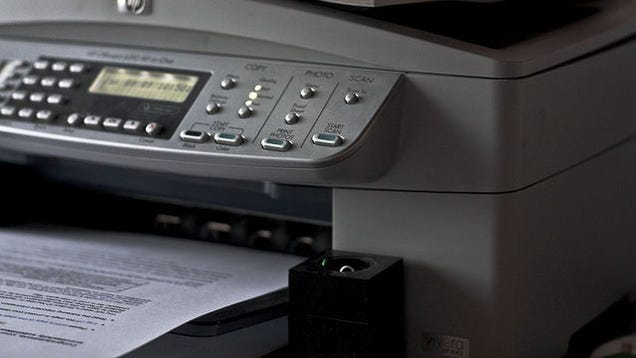
Most printers are easy to set up by following the manufacturer's instructions and using the installation disc. The process is a little trickier if you're new to computing and don't have the CD or instructions any more. This beginner's guide will show you how to get your printer up and running.

Use the Manufacturer's Instructions and Installation Disc

Always default to the instructions and use the disc that came with the printer. If you've lost your printer's manual, try doing a Google search for the name and model of your printer (which you can find by looking at your printer) plus the word "manual" (e.g., "HP Deskjet 3050 manual"). Manuals Online also has a collection of printer manuals that may help.
The set up process is usually the same for most printers:
  1. Install the cartridges in the printer and add paper to the tray.
  2. Insert installation CD and run the printer set up application (usually "setup.exe"), which will install the printer drivers.
  3. Connect your printer to the PC using the USB cable and turn it on.
  4. Look in your printers folder on your computer (on Windows XP, go to "Start" then "Printers and Faxes". On Vista and WIndows 7, hit the Windows key and type "printers" into the search box to quickly get to the Printers section. For Mac, go to System Preferences and select "Print & Fax".)
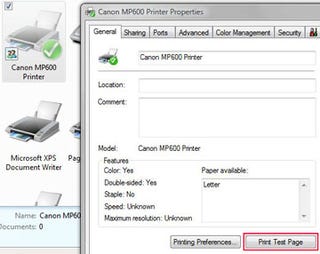
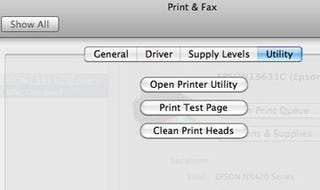
  5. Print a test page. In Windows, right-click on the printer and go to "Properties" then click the "Print Test Page" button. On Mac, click on the "Options & Supplies" button, then the "Utility" tab and click "Print Test Page"
How to Install a PrinterEXPAND
If all goes well, your test page will print and your printer will now be set up.

Download Printer Drivers from the Manufacturer

If you don't have the CD or DVD from the manufacturer any more, you'll need to download it from the manufacturer's website. As with finding the printer manual, you can do a Google search for the name and model of your printer plus the word "driver" (e.g., "HP Deskjet 3050 driver").
Here are some links to the driver downloads sections of major printer manufacturers.
  • HP: Select your printer category or type in the name and model in HP's search box.
  • Canon: Click on "Consumer & Home Office" then "Printers & Multifunction" then your printer series and finally "Drivers & Software" beside your printer model.
  • Epson: Choose your printer category then select the model, or type in the product name in Epson's search box.
Make sure you download the driver specifically for your operating system (e.g., Windows XP or Windows 7).
Then follow the instructions above, replacing the part with the installation CD and using the downloaded driver instead.

Installing a Printer Shared on Your Network

If you want to add a printer that's connected to another computer on your network, first make sure the printer is shared. In Windows, right-click on the printer name in and select "Sharing..." to get to the option to share the printer. On Mac, check the "Share this printer on the network" option in the Print & Fax section.
How to Install a PrinterEXPAND
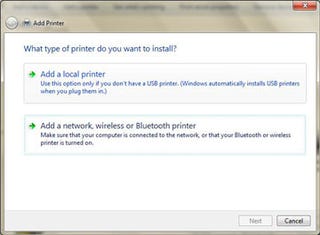
Then, use the "Add a printer" wizard to find the printer on your network. In Windows, go to the Printers folder (see step 4 above) and click "Add a printer". In the Add Printer wizard, click "Add a network, wireless or Bluetooth printer" and follow the prompts to select and install the printer.
Another way to add the shared printer is to go to the networked computer in Windows Explorer and right-click on the printer and select the option to add the printer for your computer.
On Mac, add a new printer in the Print & Fax section. Click on the "+" sign beneath the printers list, which will bring up a window showing available network printers. Choose the printer from the list, click "Add" and follow the rest of the wizard to install the printer.

Setting a Printer as the Default Printer


If you have more than one printer, you can set one as the default by right-clicking on the printer name and choosing "Set as default printer" in Windows, or in the Print & Fax settings section on Mac using the "Default printer" drop-down option. 

How To Install Windows XP Professional (Part-2 in clear Viewe)

This set of instructions is teach you how to easily install Windows XP.  In just 10 easy steps, you will be able to install and run Windows XP from your home computer, whether that is a laptop or a desktop.

**Before installing a new operating system, be sure that you have your data backed up.  Installing a new operating system will cause all of your data to be lost.**
 
Remove these adsRemove these ads by Signing Up

Step 1: Insert your Windows XP bootable disk

For this step, you will need to open your CD-Rom drive and insert your Windows XP disk.  You can now close the CD-Rom Drive. 

Step 2: How to boot from a CD

On most home computers, you will want to shut down your station.  After the station is off, you can restart it.  While the station is restarting, begin pressing the F12 key over and over again.  This will take you to the boot options menu.

Now that you are in the boot options menu, you will need to use the arrow keys on your keyboard to move over the choice for an Onboard or USB CD-ROM Drive.  Press Enter.

After you have pressed Enter, most Windows XP disks will prompt you to press any key to boot from the CD (As seen in picture 2).  When this appears, you will have only a few seconds to press any key on the keyboard.  I usually choose the Space-bar because it is the easiest to find and press. 

Step 3: Beginning the Process

After you have chosen to boot from the CD, you will have to wait a few minutes.  The disk will check your hard drive to see if windows XP is currently installed on it.  After the disk has made its check you should see a screen like the one in the first picture on this page.

You will want to press Enter because you are planning on installing Windows XP on your system.  If you realize that you have data on your hard drive and need to back it up, now would be the time to press F3 and exit the installation program to back it up.

Step 4: Licensing Agreement and Begin Setup

The next page that you will see is the Windows XP Licensing Agreement.  On this page, you can take the time to read through the agreement, but it is just saying that you will not be breaking any laws using this product.  I personally just hit F8 (to agree) and move on to the next step in the installation.

After pressing F8, you will come to the beginning of the Windows XP setup.  On this page, you will want to press the Esc key on the keyboard.  This will tell the program not to try and repair the current installation. 

Step 5: Deleting the current Partition

The next step in installing Windows XP is to delet the old partition on your hard drive.  You will see a screen similar to the one in the first picture of this page.  You will want to scroll over the C: partition that is current on your hard drive.  The next thing you will need to do is click the D key.  This will tell the program that you want to Delete the current partition.

After you click the D key, you will see a screen like the one in the second picture.  On this screen you will want to press the L key to confirm the deletion of the partition of the hard drive. 

Step 6: Beginning the Install

Now that you have deleted the old partition, you will need to be sure that partition is selected and press the Enter key.  This will tell the program that you want to install Windows XP on that partition. 

Step 7: Choosing the Type of Installation

In this step, you will want to choose whether you want to have system do a quick installation or a standard installation.  For the purposes of this set of instructions, I have chosen to do a standard installation.

After choosing your method of installation, you will want to press the Enter key to continue to the installation. 

Step 8: Allowing Windows XP to Install

This step will probably be the longest step.  This is because you are at the mercy of the system and how fast it installs Windows XP.  After you have pressed the Enter key in the last step, you will see the screen in the first picture here appear.  This will mean that the program is running the installation.

Over time, the progress bar will move across the screen, as shown in the second picture where the progress bar is at twenty-five percent.  After the Installation has finished placing the file system on your hard drive, you will see the program restart your computer.   Do not be alarmed at this.  it will boot back up and you will see a screen similar to the third picture on this page. 

Step 9: Choosing your Keyboard Layout, organization, and Computer Name

The first screen (seen in the first picture) that will come up will be a screen for you to select the language and keyboard style that you wish to use for your new installation of Windows XP.  I have chosen to use the English Language and the US keyboard layout.  You may select any configuration that you are comfortable with and then press the Next button.

The next thing the program will ask for is the name and organization that this install is affiliated with (as seen in the second picture).  You will want to fill this in with your information.  After filling in the information, you will press the Next button.

When the next screen comes up (as seen in the third picture), you will want to choose the name you want to give to your computer and the password the Administrator of the computer will have.  Press the Next button. 

Step 10: Choosing your Time Zone

You will now see the area for you to choose the time and date to be set on the computer.  This will correspond to the Time Zone in which you live.  I live in the Central Time Zone, so I have chosen to have the date and time correspond to that.  You may pick which ever you would like from this menu.

After choosing the Time Zone you are in, you will need to make sure the time is correct.  This can be done by checking the time (as seen in the second picture). 

Step 11: Waiting for Installation to continue

Now you will need to wait for the installation to continue before you can do anything more. 

Step 12: Display Settings

The installation will prompt you to improve the display settings (as seen in the first picture).  You will need to press the OK button for this to continue.

After pressing the OK button, you will see another box appear (like the one in the second picture).  This box will want you to press the OK button also. 

Step 13: Protecting your Computer and Giving it a User

After pressing OK in the last step, you will see the Microsoft Windows welcome screen appear (like the first picture).  On this page, you will want to press the next button at the bottom right.

Now you will see a screen prompting you to protect your PC.  You will want to decide if you want Windows XP to have automatic updates on or not.  I chose to have the system do automatic updating to save from the hassle of having to be sure the computer's user remembers to update the computer.  After making your choice, you will need to press the next button in the bottom right.

Now you will be prompted to give the computer a user.  For the purposes of this set of instructions I gave it a user named "MyName", but you can name this user whatever  you would like.  After giving the computer at least one user (you may want to give it many), you will need to press the next button.

Step 14: Finishing the Installation

After pressing the next button, you will see a Thank you screen.  On this screen you will need to press Finish.

This will bring up a screen similar to the second picture on this page.

Now you will see that the computer has logged you in for the first time.  You should see a screen like the third picture on this page.

I hope you enjoyed the tutorial on how to install Windows XP Professional!

How To Install Windows XP Professional

Before the install/reinstallation of Windows XP, I highly recommend that you download Service Pack 3 “for multiple computers”and burn it onto a CD. The download is approximately 316.4MB. If you choose not to do this step, your system could become infected with a virus or worm exploiting the vulnerabilities that Service Pack 3 fixes. I also recommend that you do NOT have your system connected to the Internet until after the installation of Service Pack 3. This means that you cannot activate your XP installation during setup, but you can accomplish that task following a reboot after Service Pack 3 is installed.

1) Shall we begin? (Image 1.1)

After configuring the system for booting from a CD, the Windows Setup screen appears.
At this point, Setup is loading the driver files it needs to continue with installation.
1) Shall we begin? (Image 1.1)

2) Welcome to Setup: (Image 1.2)

The “Welcome to Setup” screen appears with the option of Continuing Setup, Repair a previous installation, or Quitting.
Press ENTER to Continue Setup.
You may also choose R to Repair, or F3 to Quit and reboot the system.
2) Welcome to Setup: (Image 1.2)

3) Windows XP Licensing Agreement: (Image 1.3)

The “Windows XP Licensing Agreement” screen, otherwise known as “EULA,” displays the legal in’s and out’s of this particular software package.
You may press F8 to signify that you agree with the terms, hit ESC if you do not agree and PAGE UP or PAGE DOWN to scroll through each screen. Note: If you do not agree to the terms, setup will quit and reboot the system.
3) Windows XP Licensing Agreement: (Image 1.3)

4) Hard drive partition information: (Image 1.4)

Hard drive partition information is now displayed. This varies with each systems hardware configuration.
This example already has a partition defined. I will choose not to use this and create a new one by pressing D.
You may skip this and the next few steps if you do not have any partitions defined.
At this point, the options include pressing ENTER to Install on the selected partition, D to Delete the selected partition, or F3 to Quit and reboot the system.
4) Hard drive partition information: (Image 1.4)

5) Warning screen: (Image 1.5)

After pressing D to delete the selected partition, a warning screen appears explaining the pitfalls of deleting it. This particular screen only appears when the partition selected to be deleted is formatted as a bootable system partition. Other partitions will display the next screen.
I want this to happen, so I press ENTER to continue.
The options include pressing ENTER to continue, or ESC to Cancel.
5) Warning screen: (Image 1.5)

6) Confirmation screen: (Image 1.6)

A confirmation screen that displays the logical drive, what file system the partition is currently using, the size in MB and controller information.
Options include L to Delete the partition and ESC to Cancel the action.
6) Confirmation screen: (Image 1.6)

7) No partitions have been previously defined: (Image 1.7)

If no partitions have been previously defined, this screen will be displayed. You may section your hard drive in as many partitions as you wish by selecting C to Create a Partition and then entering in a value less then the total available. Here, I will Create a Partition in the highlighted, unused portion.
Select the partition you wish to install to using the UP arrow and DOWN ARROW keys.
Press ENTER to use the highlighted partition and Install, C to Create a Partition, or F3 to Quit and reboot the system.
7) No partitions have been previously defined: (Image 1.7)

8) Enter in the partition size: (Image 1.8)

Enter in the partition size in MB within the displayed minimum and maximum. I chose the default or maximum available here.
You may choose ENTER to Create the new partition or ESC to Cancel the action.
8) Enter in the partition size: (Image 1.8)

9) Continue to create partitions: (Image 1.9)

Continue to create partitions until all space is used or the configuration meets your requirements.
Note: a small portion will be unavailable to partition. This is normal. In this example, it is 2 MB.
I chose drive C: or Partition1 to install the Operating System.
You may choose ENTER to Install to the selected partition, D to Delete the highlighted Partition, or F3 to Quit and reboot the system.
9) Continue to create partitions: (Image 1.9)

10) Format the partition: (Image 1.10)

Since this OS supports NTFS, format the partition with it. If you do not, many folder and file security features will be unavailable. Note: If you are dual booting your system, a previous OS will not be able to read the local information. This is a fact with Windows 9x and Me. If you have a requirement to view this partition from another OS installed on the system, do not format it as NTFS. Also, the boot partition must be formatted with FAT32 if you wish to dual boot. I have found no problems accessing a NTFS partition mapped as a network drive from an older OS.
Select what format you wish to use by pressing the UP ARROW and DOWN ARROW keys.
Press ENTER to confirm your selection and Continue or ESC to Cancel.
10) Format the partition: (Image 1.10)

11) Setup formats the partition: (Image 1.11)

Watch the progress bar as Setup formats the partition, or get up and get a soda. It may take awhile.
11) Setup formats the partition: (Image 1.11)

12) Creating File List: (Image 1.12)

Setup is now figuring out what files to copy over to the hard drive.
12) Creating File List: (Image 1.12)

13) Setup copies various files: (Image 1.13)

After the partition is finished formatting, Setup copies various files to support booting from the hard drive and continue on.
13) Setup copies various files: (Image 1.13)

14) Creates various information files: (Image 1.14)

Setup then creates various information files required to continue on with setup.
14) Creates various information files: (Image 1.14)

15) Press ENTER to Restart: (Image 1.15)

The first reboot and the end of the blue background has arrived. If you are impatient, press ENTER to Restart before the 15 seconds expire.
ENTER to Restart the Computer is the only option available.
15) Press ENTER to Restart: (Image 1.15)

16) Windows XP boot screen: (Image 2.1)

The new Windows XP boot screen is displayed.
16) Windows XP boot screen: (Image 2.1)

17) Windows XP Installation: (Image 2.2)

If you have installed Windows before, this type of screen will look familiar.
Sit back. It may be awhile.
17) Windows XP Installation: (Image 2.2)

18) Faster and more reliable: (Image 2.3)

Every Windows OS that comes out has the same claim. Faster and better. It is subject to debate whether or not it could get “any worse.”
18) Faster and more reliable: (Image 2.3)

19) Region and Input Languages: (Image 2.4)

A little while later, you will be prompted with options of configuring your Region and Input Languages. The default was fine for me, so I selected Next.
Options include Customize button, Details Button, plus the standard Back and Next.
19) Region and Input Languages: (Image 2.4)

20) Enter in your Name: (Image 2.5)

Enter in your Name and optional Organization information, then select the Next button.
20) Enter in your Name: (Image 2.5)

21) 25 digit Product Key: (Image 2.6)

Thought you could get away from it? Think again.
Enter your unique 25 digit Product Key that came with your CD, then select the Next button.
21) 25 digit Product Key: (Image 2.6)

22) Enter a Computer name and an Administrator Password: (Image 2.7)

The “suggested” name for the computer is always really whacked out. Choose one that meets your needs.
Enter an Administrator Password now. It is VERY IMPORTANT that you keep this information safe and remember what it is! “01Pa$$word” is not a good choice. Think of something secure and never lose or forget it.
22) Enter a Computer name and an Administrator Password: (Image 2.7)

23) Date, Time and Time Zone: (Image 2.8)

Configure the proper information for the Date, Time and Time Zone here.
23) Date, Time and Time Zone: (Image 2.8)

24) Network is installing: (Image 2.9)

Wait here while the Network is installing. You could read all the marketing dribble, but I do not recommend it. :)
24) Network is installing: (Image 2.9)

25) Network Settings Dialog: (Image 3.1)

The Network Settings Dialog is next. Under usual circumstances, the Typical settings are fine, but I never choose them so I can poke around under the hood. I selected Custom settings here.
Choose your method and select the Next button.
25) Network Settings Dialog: (Image 3.1)

26) Custom settings: (Image 3.2)

In the Custom settings, many options are abound. I cannot go into all of them here, but I will hit on the high points.
26) Custom settings: (Image 3.2)

27) QoS Packet Scheduler: (Image 3.3)

QoS Packet Scheduler is not required unless your network uses it.
For this system, I will choose to uncheck it.
27) QoS Packet Scheduler: (Image 3.3)

28) TCP/IP Properties: (Image 3.4)

TCP/IP Properties contains the standard options. Adjust them for your particular needs as required. For now, I kept the default settings. Basically, it is using DHCP to configure TCP/IP. If you are using a static IP address, enter in the proper information here.
Select the Advanced button to further configure your TCP/IP options.
28) TCP/IP Properties: (Image 3.4)

29) Workgroup or Computer Domain: (Image 3.5)

Workgroup or Computer Domain, that is the question. I am not going to set up this system to connect to a domain controller, so I will place it as a member of a workgroup.
Please, change “WORKGROUP” to something else. I hate defaults. :)
Select the Next button after making your choice.
29) Workgroup or Computer Domain: (Image 3.5)

30) Install screen: (Image 3.6)

The system will reboot after all files have been copied over to the install partition. Now may be a good time to take a break. It may be awhile.
30) Install screen: (Image 3.6)

31) Windows XP is starting up: (Image 4.1)

The moment we have all been waiting for, Windows XP Professional is starting up “for the first time.” Remember that quoted statement with Windows 95 setup?
31) Windows XP is starting up: (Image 4.1)

32) Display Settings Pop-up: (Image 4.2)

Windows XP no longer likes the “default” resolution of 640 x 480 and prompts you of that fact.
Select OK to continue.
32) Display Settings Pop-up: (Image 4.2)

33) Please wait: (Image 4.3)

800 x 600 is a wonderful thing, however, I chose to have it time out and return to 640 x 480 for this guide.
33) Please wait: (Image 4.3)

34) Login to the Administrator account: (Image 4.4)

With the “Welcome” screen, you no longer have to hit the “Three Finger Salute” combination of Ctrl+Alt+Delete to login to the Administrator account.
You did remember your password, right?!?
34) Login to the Administrator account: (Image 4.4)

35) Applying computer settings: (Image 4.5)

Please wait while the Administrator account is configured “for the first time.”
No. I will not mention Windows 95 again…
35) Applying computer settings: (Image 4.5)

36) Display Settings Pop-up: (Image 4.6)

Since the initial screen resolution is set to 640 x 480, a balloon dialog appears. You may click the pop-up balloon to raise the resolution up to 800 x 600 automatically. For the rest of this guide, I chose to ignore it.
36) Display Settings Pop-up: (Image 4.6)

37) Windows XP tour: (Image 5.1)

Click the balloon dialog to start a tour of Windows XP.
Even if you do not wish to see the information, you should click on the balloon to get rid of the annoyance in a timely fashion.
37) Windows XP tour: (Image 5.1)

38) Windows XP Tour dialog: (Image 5.2)

Windows XP Tour dialog popup is shown.
Select the Cancel button to never see it again.
38) Windows XP Tour dialog: (Image 5.2)

39) .NET Passport Wizard: (Image 5.3)

Double-Click the Messenger Icon in the bottom right (system tray) and the “.NET Passport Wizard” dialog appears.
Select Cancel to not sign up for Passport at this time.
39) .NET Passport Wizard: (Image 5.3)

40) Windows Messenger: (Image 5.4)

With the .NET Passport Wizard gone, the Windows Messenger is opened.
40) Windows Messenger: (Image 5.4)

41) Windows Messenger Tools: (Image 5.5)

Select Tools, then Options.
41) Windows Messenger Tools: (Image 5.5)

42) Messenger Preferences: (Image 5.6)

In the Options window, select the Preferences Tab.
Uncheck “Run this program when Windows starts” and “Allow this program to run in the background.” Of course, if you wish to keep Windows Messenger, do not do this step.
42) Messenger Preferences: (Image 5.6)

43) Close Messenger: (Image 5.7)

Now you can select the Close button and Messenger will be unloaded from memory.
43) Close Messenger: (Image 5.7)

44) That is all! (Image 5.8)

That’s all there is to it! I hope this guide helped you out or gave you a sneak peek at what is to come. More information
about Windows XP is located HERE!
44) That is all! (Image 5.8)