WATCH LIVE CRICKET


Monday, September 8, 2014

How to install SQL Server 2008 R2

The following are software requirements:
bullet.Net Framework 3.5 SP1 is needed.
bulletWindows Installer 4.5 or later is required.
bulletInternet Explorer 6 SP1 is required.
bulletFor operating systems requirements, please click here. Windows Web Server and Windows Server 2008 Standard do not have the failover cluster feature available.
bulletPowerShell is required for SQL Server Express with Advanced Services.
bulletIf you have Visual Studio 2008 installed on the computer where you are planning to install SQL Server R2, please install Visual Studio 2008 SP1 prior to run SQL Server setup.

The hardware requirements are:

bulletAt least 2.0 GB of available hard disk space
bulletSupported Operating Systems: Windows Server 2008 ; Windows Server 2003 Service Pack 2; Windows Server 2003 Small Business Server R2; Windows Vista; Windows XP Service Pack 2
bullet1024 x 768 video resolution.
bulletFor processor and memory requirements,

Run SQL Server 2008 R2 setup. First, setup checks to determine software requirements are installed. If not, you will be prompted to install.


As mentioned above, SQL Server 2008 R2 requires Windows Installer 4.5 and .Net Framework 3.5 SP1 to be installed. Click OK button to install .Net Framework.


After installing .Net Framework 3.5 SP1, I was prompted to install Windows Installer (KB942288).


After installing the hotfix, the Installation Center will launch.


On the screen above, make a click on the "Installation" hyperlink in the left side of the screen.


This screen shows the types of installation available.  Let's select the first type available "New SQL Server stand-alone installation or add features to an existing installation".


Above you will find the first set of Setup Support Rules. The Next button is available only if all check results are successful, or if failed checks do not block installation


On the page above, specify the edition of SQL Server to install.  We chose the Enterprise Evaluation Edition.


The above is the License Terms page.  Read the license agreement and if you agree with it, check the "I accept the license terms" check box, and then click the Next button.


On the following page, setup is installing a required component.


The following is a new page on SQL Server setup, its name is Setup Role. Here you have three options:
bulletChoose "SQL Server feature installation" to install SQL Server Database Engine, Analysis Services, Integration Services, Reporting Services.
bulletChoose "Analysis Services with SharePoint Integration" if you want SQL Server setup to add PowerPivot for SharePoint to a SharePoint farm.
bulletChoose "All Features With Defaults" to install all features of SQL Server in one box.


On the Feature Selection page, select the features for your installation.


The page below belongs to the second set of Setup Support Rules.


On the Instance Configuration page, select a default or named instance for your installation, and select de directory where you want to install de features you have chosen.


This page is just for the purpose of reviewing disk usage.  Click on the "Next" button to continue setup.


It is recommended to create a local user or domain user account to start SQLServer services, the next page setup will display is all about SQL Server service accounts.

If the computer is not part of a domain, use a local user account without Windows administrator permissions. You can create this account using Control Panel -> User Accounts.

Use a Domain User Account if the service must interact with network services or access domain resources. This account should be pre-created by a domain administration in your environment.
Whether you create a local user or a domain user account, the password you use to create the account must be a strong password.

You can also use built-in accounts as the NetworkService account, but I would not recommend to use Local Service Account for SQL Server (MSSQLSERVER). Use Local System if you need a very high-privileged account. It has extensive privileges on the local system.


Microsoft recommends you to specify an individual account for each service. The service accounts used for this configuration must have a strong password as mentioned above, otherwise you will get the error "Invalid or missing username or password. To continue, provide valid credentials for the SQL Server Agent service".  A strong password  is one that has a combination of letters in uppercase, lowercase, numbers and special characters.


On the Collation tab, specify the collation for your SQL Server instance.


On the Database Engine Configuration page, choose the authentication mode to use for your SQL Server installation.

Enter and confirm the password for the (sa) login when you choose Mixed Mode Authentication.


If you are planning to use FILESTREAM with SQL Server 2008 R2, you may want to enable it on this tab or do it later.


On this page, provide user account that will be Analysis Services administrators.


If you selected Reporting Services as a feature to install, the Report Services Configuration page is displayed.   Here we chose to install Reporting Services on Native mode.


On the Error and Usage Reporting page, optionally clear each check box to disable error reporting.


The above screens belong to the Installation Configuration Rules.


On the Ready to Install page, review the summary of features and components for your SQL Server installation. To proceed, click Install.


On the Completing the Microsoft SQL Server Installation click Close.

How to Install a Printer

   How to Install a Printer
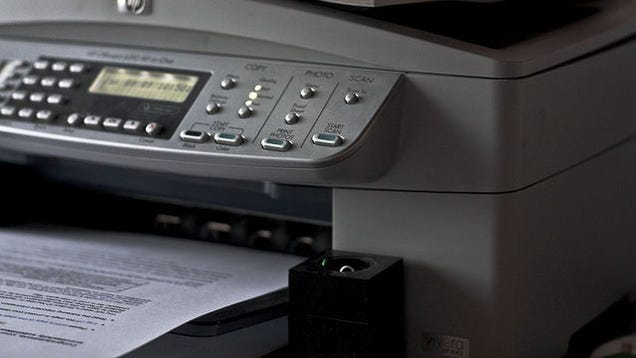
Most printers are easy to set up by following the manufacturer's instructions and using the installation disc. The process is a little trickier if you're new to computing and don't have the CD or instructions any more. This beginner's guide will show you how to get your printer up and running.

Use the Manufacturer's Instructions and Installation Disc

Always default to the instructions and use the disc that came with the printer. If you've lost your printer's manual, try doing a Google search for the name and model of your printer (which you can find by looking at your printer) plus the word "manual" (e.g., "HP Deskjet 3050 manual"). Manuals Online also has a collection of printer manuals that may help.
The set up process is usually the same for most printers:
  1. Install the cartridges in the printer and add paper to the tray.
  2. Insert installation CD and run the printer set up application (usually "setup.exe"), which will install the printer drivers.
  3. Connect your printer to the PC using the USB cable and turn it on.
  4. Look in your printers folder on your computer (on Windows XP, go to "Start" then "Printers and Faxes". On Vista and WIndows 7, hit the Windows key and type "printers" into the search box to quickly get to the Printers section. For Mac, go to System Preferences and select "Print & Fax".)
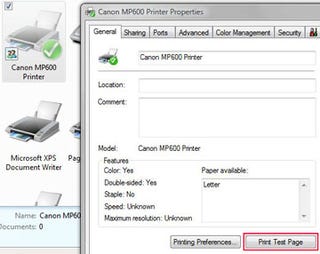
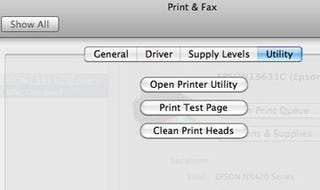
  5. Print a test page. In Windows, right-click on the printer and go to "Properties" then click the "Print Test Page" button. On Mac, click on the "Options & Supplies" button, then the "Utility" tab and click "Print Test Page"
How to Install a PrinterEXPAND
If all goes well, your test page will print and your printer will now be set up.

Download Printer Drivers from the Manufacturer

If you don't have the CD or DVD from the manufacturer any more, you'll need to download it from the manufacturer's website. As with finding the printer manual, you can do a Google search for the name and model of your printer plus the word "driver" (e.g., "HP Deskjet 3050 driver").
Here are some links to the driver downloads sections of major printer manufacturers.
  • HP: Select your printer category or type in the name and model in HP's search box.
  • Canon: Click on "Consumer & Home Office" then "Printers & Multifunction" then your printer series and finally "Drivers & Software" beside your printer model.
  • Epson: Choose your printer category then select the model, or type in the product name in Epson's search box.
Make sure you download the driver specifically for your operating system (e.g., Windows XP or Windows 7).
Then follow the instructions above, replacing the part with the installation CD and using the downloaded driver instead.

Installing a Printer Shared on Your Network

If you want to add a printer that's connected to another computer on your network, first make sure the printer is shared. In Windows, right-click on the printer name in and select "Sharing..." to get to the option to share the printer. On Mac, check the "Share this printer on the network" option in the Print & Fax section.
How to Install a PrinterEXPAND
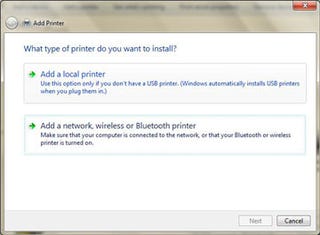
Then, use the "Add a printer" wizard to find the printer on your network. In Windows, go to the Printers folder (see step 4 above) and click "Add a printer". In the Add Printer wizard, click "Add a network, wireless or Bluetooth printer" and follow the prompts to select and install the printer.
Another way to add the shared printer is to go to the networked computer in Windows Explorer and right-click on the printer and select the option to add the printer for your computer.
On Mac, add a new printer in the Print & Fax section. Click on the "+" sign beneath the printers list, which will bring up a window showing available network printers. Choose the printer from the list, click "Add" and follow the rest of the wizard to install the printer.

Setting a Printer as the Default Printer


If you have more than one printer, you can set one as the default by right-clicking on the printer name and choosing "Set as default printer" in Windows, or in the Print & Fax settings section on Mac using the "Default printer" drop-down option. 

How To Install Windows XP Professional (Part-2 in clear Viewe)

This set of instructions is teach you how to easily install Windows XP.  In just 10 easy steps, you will be able to install and run Windows XP from your home computer, whether that is a laptop or a desktop.

**Before installing a new operating system, be sure that you have your data backed up.  Installing a new operating system will cause all of your data to be lost.**
 
Remove these adsRemove these ads by Signing Up

Step 1: Insert your Windows XP bootable disk

For this step, you will need to open your CD-Rom drive and insert your Windows XP disk.  You can now close the CD-Rom Drive. 

Step 2: How to boot from a CD

On most home computers, you will want to shut down your station.  After the station is off, you can restart it.  While the station is restarting, begin pressing the F12 key over and over again.  This will take you to the boot options menu.

Now that you are in the boot options menu, you will need to use the arrow keys on your keyboard to move over the choice for an Onboard or USB CD-ROM Drive.  Press Enter.

After you have pressed Enter, most Windows XP disks will prompt you to press any key to boot from the CD (As seen in picture 2).  When this appears, you will have only a few seconds to press any key on the keyboard.  I usually choose the Space-bar because it is the easiest to find and press. 

Step 3: Beginning the Process

After you have chosen to boot from the CD, you will have to wait a few minutes.  The disk will check your hard drive to see if windows XP is currently installed on it.  After the disk has made its check you should see a screen like the one in the first picture on this page.

You will want to press Enter because you are planning on installing Windows XP on your system.  If you realize that you have data on your hard drive and need to back it up, now would be the time to press F3 and exit the installation program to back it up.

Step 4: Licensing Agreement and Begin Setup

The next page that you will see is the Windows XP Licensing Agreement.  On this page, you can take the time to read through the agreement, but it is just saying that you will not be breaking any laws using this product.  I personally just hit F8 (to agree) and move on to the next step in the installation.

After pressing F8, you will come to the beginning of the Windows XP setup.  On this page, you will want to press the Esc key on the keyboard.  This will tell the program not to try and repair the current installation. 

Step 5: Deleting the current Partition

The next step in installing Windows XP is to delet the old partition on your hard drive.  You will see a screen similar to the one in the first picture of this page.  You will want to scroll over the C: partition that is current on your hard drive.  The next thing you will need to do is click the D key.  This will tell the program that you want to Delete the current partition.

After you click the D key, you will see a screen like the one in the second picture.  On this screen you will want to press the L key to confirm the deletion of the partition of the hard drive. 

Step 6: Beginning the Install

Now that you have deleted the old partition, you will need to be sure that partition is selected and press the Enter key.  This will tell the program that you want to install Windows XP on that partition. 

Step 7: Choosing the Type of Installation

In this step, you will want to choose whether you want to have system do a quick installation or a standard installation.  For the purposes of this set of instructions, I have chosen to do a standard installation.

After choosing your method of installation, you will want to press the Enter key to continue to the installation. 

Step 8: Allowing Windows XP to Install

This step will probably be the longest step.  This is because you are at the mercy of the system and how fast it installs Windows XP.  After you have pressed the Enter key in the last step, you will see the screen in the first picture here appear.  This will mean that the program is running the installation.

Over time, the progress bar will move across the screen, as shown in the second picture where the progress bar is at twenty-five percent.  After the Installation has finished placing the file system on your hard drive, you will see the program restart your computer.   Do not be alarmed at this.  it will boot back up and you will see a screen similar to the third picture on this page. 

Step 9: Choosing your Keyboard Layout, organization, and Computer Name

The first screen (seen in the first picture) that will come up will be a screen for you to select the language and keyboard style that you wish to use for your new installation of Windows XP.  I have chosen to use the English Language and the US keyboard layout.  You may select any configuration that you are comfortable with and then press the Next button.

The next thing the program will ask for is the name and organization that this install is affiliated with (as seen in the second picture).  You will want to fill this in with your information.  After filling in the information, you will press the Next button.

When the next screen comes up (as seen in the third picture), you will want to choose the name you want to give to your computer and the password the Administrator of the computer will have.  Press the Next button. 

Step 10: Choosing your Time Zone

You will now see the area for you to choose the time and date to be set on the computer.  This will correspond to the Time Zone in which you live.  I live in the Central Time Zone, so I have chosen to have the date and time correspond to that.  You may pick which ever you would like from this menu.

After choosing the Time Zone you are in, you will need to make sure the time is correct.  This can be done by checking the time (as seen in the second picture). 

Step 11: Waiting for Installation to continue

Now you will need to wait for the installation to continue before you can do anything more. 

Step 12: Display Settings

The installation will prompt you to improve the display settings (as seen in the first picture).  You will need to press the OK button for this to continue.

After pressing the OK button, you will see another box appear (like the one in the second picture).  This box will want you to press the OK button also. 

Step 13: Protecting your Computer and Giving it a User

After pressing OK in the last step, you will see the Microsoft Windows welcome screen appear (like the first picture).  On this page, you will want to press the next button at the bottom right.

Now you will see a screen prompting you to protect your PC.  You will want to decide if you want Windows XP to have automatic updates on or not.  I chose to have the system do automatic updating to save from the hassle of having to be sure the computer's user remembers to update the computer.  After making your choice, you will need to press the next button in the bottom right.

Now you will be prompted to give the computer a user.  For the purposes of this set of instructions I gave it a user named "MyName", but you can name this user whatever  you would like.  After giving the computer at least one user (you may want to give it many), you will need to press the next button.

Step 14: Finishing the Installation

After pressing the next button, you will see a Thank you screen.  On this screen you will need to press Finish.

This will bring up a screen similar to the second picture on this page.

Now you will see that the computer has logged you in for the first time.  You should see a screen like the third picture on this page.

I hope you enjoyed the tutorial on how to install Windows XP Professional!